Enhance your one-handle tub/shower faucet repair knowledge with detailed installation instructions and a “How to” video.
How to Repair a Leaky One-Handle Tub/Shower Faucet
WATCH VIDEO
![]()
How To Instructions
Step-by-step Instructions
Leaky tub and shower faucets are not on our list of favorite things. But they’re relatively simple to fix yourself. With a few tools and the right replacement part, you can fix that leaky faucet yourself.
Tools required: Allen Wrench, Wrench, Pliers, Needle Nose Pliers, screwdriver and a cleaner to remove mineral build-up
1
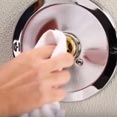
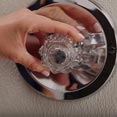
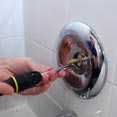
Turn off the Main water-supply to your home (usually found outside near the street). For Knob Style Handles, remove the index Button by prying off with a Screwdriver.
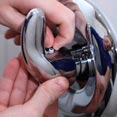
For Lever Handles, remove the Set Screw with a Screwdriver or Allen Wrench and then remove the Handle.
2
Unscrew the Handle Screw and remove the Handle.
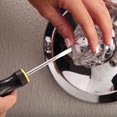
3

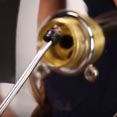
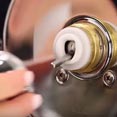
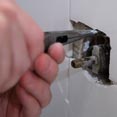
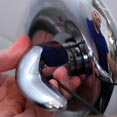
Loosen the cam nut to reveal the plastic cam and ball assembly. The cam nut is a dome-shaped piece below the handle. Turn the cam nut counter clockwise to remove.
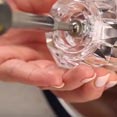
4
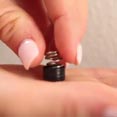
Lift out the plastic cam and cam gasket to expose the ball and remove the ball from the faucet.
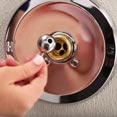
5
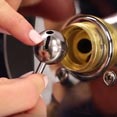
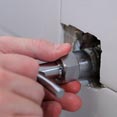
Look back into where the ball came from. There should be two rubber seats and springs. Use needle nose Pliers to remove them.
6
Thoroughly clean the inside of the faucet body with cleaner intended to remove mineral build-up or use plain vinegar.
7
Once you have purchased your new ball assembly, you can install it into the faucet. Start with installing the seats and springs FIRST. Insert the spring wide-end first then place the rubber seat over the narrow end of the spring.
7A
TIP: You may find it easier to assemble the seat and spring outside of the faucet and then place onto the tip of a screwdriver and insert them into the faucet body.
8
Place the Ball back into the Faucet Assembly. The Ball may have a notch that fits a small peg inside the faucet. Align the peg and notch on the ball assembly to ensure proper installation into the Faucet.
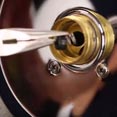
9
Install the replacement Gasket Cam and Plastic Cam over the top of the Ball and place the Cam Nut over the Plastic Cam, and then tighten the Nut with Pliers.
10
Slide the Handle onto the Ball Stem or Handle Adapter. Do not use Handle Screws at this point. Turn the water supply back on and test for leaks and ensure the hot water temperature is adequate. If there are leaks, or if the handle is too hard to move, adjust the adjustment ring inside the cam nut (the brass or plastic ring with two notches on the top of it). Be sure not to exceed the maximum temperature allowed by local plumbing code. Finally, secure the Handle with the Set Screw and your project is complete.
Step-by-step Instructions
Leaky tub and shower faucets are not on our list of favorite things. But they’re relatively simple to fix yourself. With a few tools and the right Danco replacement part, you can fix that leaky faucet yourself.
Tools required: Phillips Screwdriver, Cartridge Puller, Pliers, Needle Nose Pliers, Fine Sandpaper or Steel Wool, Silicone Grease
1
Turn off the Main water-supply to your home (usually found outside near the street). For this type of Handle, remove the Set Screw with a Screwdriver and then remove the Handle. If you have a Knob Style Handle, remove the Handle Button by prying off with a Screwdriver, then unscrew the Handle Screw and remove the Handle.
2
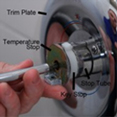
Next, remove the Temperature Limit Stop, Key Stop, Stop Tube, and the Trim Plate (as needed to access Cartridge).
3
Remove the Retainer Clip carefully as not to drop it behind wall.
4
The easiest way to remove the old Cartridge is to use a Cartridge Puller. Make sure to follow the instructions for the Cartridge Puller, which can be purchased at your local home improvement store. Because Cartridges are unique to specific type of Faucets, you will want to take your old Cartridge to your local home improvement store and use the Perfect Match locator system from Danco or use the online Stem Finder. This system makes it easy to find your replacement.
5
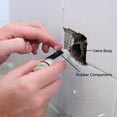
Using Silicone Grease, lubricate the inside of the Valve Body about 1. Then lubricate the Exterior Rubber Components on the Cartridge with Silicone Grease as well.
6
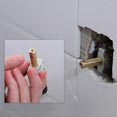
Insert the new Cartridge, Hot inlet Left Side, Cold inlet Right Side into the Valve Body with the tab stamped “HC” on top and with the Stem Notch down.
7
Reinstall Trim Plate with original Screws.
8

Reinstall the Retainer Clip, Stop Tube, Key Stop, and the Temperature Limit Stop, in that order.
9
Slide the Handle onto the Stem or Handle Adapter onto the Stem. Do not use Handle Screws at this point. Turn the water supply back on and test for leaks and ensure the hot water temperature is adequate. Be sure not to exceed the maximum temperature allowed by local plumbing code. Finally, secure the Handle with the Set Screw and your project is complete.